-
성당창문 콘센트 가리개를 만들었어요.소소한 바느질/소품 2022. 10. 8. 15:44
거실 벽 한쪽에 에어컨용 콘센트가 있는데 실제 설치는 다른 쪽에 해서 사용하지 않아요.
아무래도 먼지도 쌓이고 보기에도 안 좋길래 가리개를 만들기로 했어요.
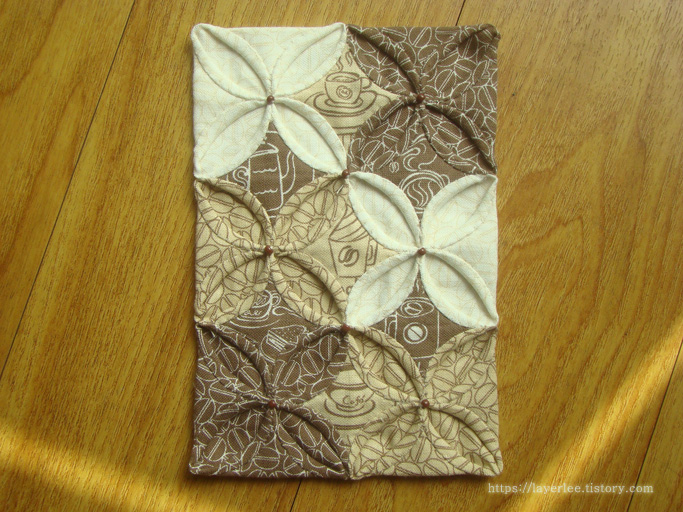
성당창문, 카테드랄 윈도우 혹은 여의주문이라 불리는 방식의 가리개를 만들었어요.
콘센트가 직사각 형태이므로 딱지도 2 X 3으로 6개를 사용하고 크기도 그에 맞췄어요.
딱지 하나의 크기가 5X5 Cm가 되도록 계획했지만 손바느질 과정에서 조금 작아져서 완성은 9.5 X 14 Cm 가량입니다.
전부 100% 손바느질 작업이에요.
원단은 거실 벽의 체리우드 색에 맞춰 브라운 계열 커피콩 패턴의 모카포트 면 원단을 사용했어요.
여의주문 안의 그림은 모카포트 원단에 있는 패치 그림을 잘라서 사용했습니다.
조금 더 가까이에서 찍은 사진이에요.
20수 면 원단이어서 도톰하다 보니 접히는 부분이 두꺼워져 이전 30수 면보다 힘이 더 들긴 했어요.

전체를 볼 수 있는 세로 사진입니다. 교차점마다 갈색 시드 비즈를 달아줬어요. 이전 컵받침에는 못 달았던 거예요.
원단이 아이보리가 기본 바탕색이라 바느질실도 그에 맞춰서 아이보리색을 사용했어요.

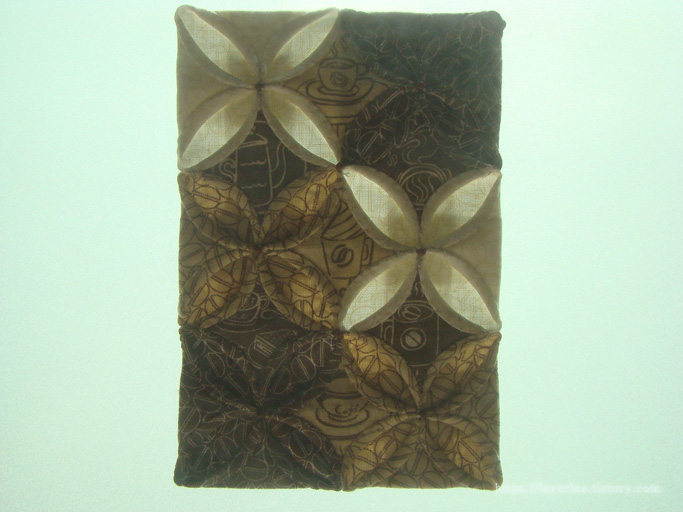
역시나 대망의 역광 사진입니다.
바탕색이 밝은 패턴은 빛이 잘 들어와요. 이래서 창에 거는 여의주문은 밝은 원단으로 만들어야 합니다.
뒷면입니다. 기본 딱지를 접기만 하는 게 아니라 바느질로 만들고 연결도 안쪽에서 바느질하는 방식을 사용해서 뒷면이 매끈하게 나오도록 했어요.

좀 더 근접 사진입니다. 갈색 시드비즈는 가진 게 불투명 밖에 없어서 조금 아쉬워요.
오랜만에 여의주문 작업을 하면서 잊었던 작업법도 다시 떠올리고 새로운 방식도 생각하면서 했어요.

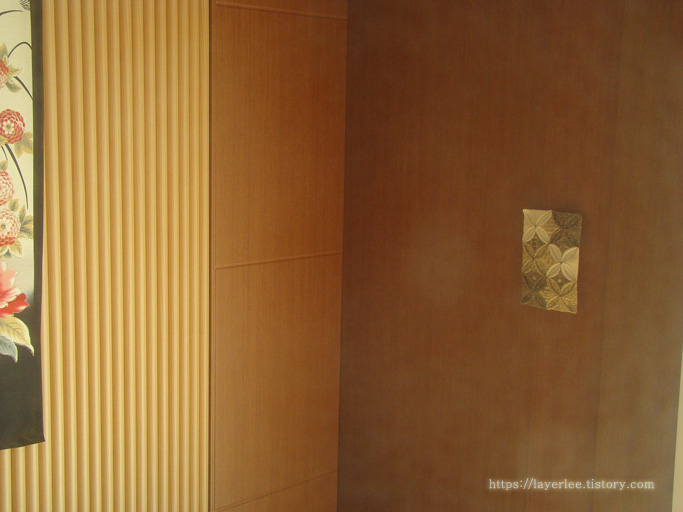
실제 벽의 콘센트에 붙인 모습입니다. 임시로 약한 테이프로 붙였는데 조만간 양면 테이프로 다시 붙일 거예요.
카메라가 오래 되다보니 렌즈 안쪽에 얼룩이 있는데 빛이 들어오는 것에 따라 이렇게 부옇게 비치기도 합니다.
예전에 작업했던 컵받침과 함께 찍었어요. 컵받침 포스팅은 '여기'입니다.
컵받침은 딱지 크기를 6센티로 했고 이번 것이 5센티인데 크기 차이가 보입니다.
굉장히 오랜만에 작업한 여의주문인데 실밥 처리를 제대로 못한 부분이 있긴 하지만 모양이 잘 나와서 만족해요.

사용재료는 천싸요의 20수 면 원단 모카포트와 2미리 갈색 시드비즈입니다.
재단과 기본 딱지 바느질에 하루, 딱지 연결과 다림질 그리고 날개 바느질 작업 일부에 하루 그리고 나머지 날개 바느질 작업과 비즈 달기에 하루 해서 꼬박 3일이 걸린 작업이에요.
여의주문의 저 둥근 곡선을 접어 공그르기하는 것을 무어라 부르는지 몰라서 날개 바느질이라고 했어요.
3일 동안 바느질해서 손바닥만한 가리개 하나이니 여의주문이 얼마나 손이 많이 가는 작업인지 알 수 있어요.
그래서 여의주문으로 보를 만들어 완성하면 소원이 이뤄진다는 말도 있는 모양이에요.
위의 컵받침 포스팅을 확인하니 벌써 7년도 넘었더라고요.
콘센트 가리개를 생각할 때 스위치에도 비슷하게 뭔가를 덮어주는 게 어떨까 생각을 했거든요.
모시 원단으로 살짝 비치게 만들어서 덮으면 될 것 같아서요.
어제 조금 검색해 보니 스위치 가리개라고 간단하게는 제가 생각했던 것과 같은 원단만으로 된 것도 있고 나무 박스형태로 된 것도 있고 여러 가지가 나오더군요.
박스 형태까지는 필요없고 그냥 간단하게 원단으로 만들어서 사용해 봐야겠어요.
단일 스위치는 그냥 만들면 되고 2, 3개짜리 스위치는 자수를 놔서 구분을 하는 것도 좋을 듯해요.
'소소한 바느질 > 소품' 카테고리의 다른 글
괴불 노리개와 복숭아 노리개를 만들었어요. (0) 2022.10.27 패브릭 스위치 가리개를 만들었어요. (1) 2022.10.11 큐렛 케이스용 조리개 파우치를 만들었어요. (0) 2022.04.07 특별한 용돈 파우치를 만들었어요. (0) 2022.01.12 네일 용품용 미니 트레이를 만들었어요. (0) 2021.12.22